作成日: 2021/05/18 最終更新日: 2021/05/18
文書種別
使用方法
詳細
予定の左側に表示される青い帯(「予定あり」ステータスを示すステータスバー:デフォルトで青色)の色は、以下の2通りの方法で変更することが可能です。
【方法①】
最初に、個別の予定に使用するためのユーザーステータスを作成し、そのColorプロパティで色を設定して、C1ScheduleのDataStorage.StatusStorageに追加します。次いで、各AppointmentオブジェクトのBusyStatusプロパティに、これらのユーザーステータスを設定します。
※ユーザーステータスのBrush.Styleプロパティを用いて、ステータスバーのパターンを設定することも可能です。
【方法①】
最初に、個別の予定に使用するためのユーザーステータスを作成し、そのColorプロパティで色を設定して、C1ScheduleのDataStorage.StatusStorageに追加します。次いで、各AppointmentオブジェクトのBusyStatusプロパティに、これらのユーザーステータスを設定します。
※ユーザーステータスのBrush.Styleプロパティを用いて、ステータスバーのパターンを設定することも可能です。
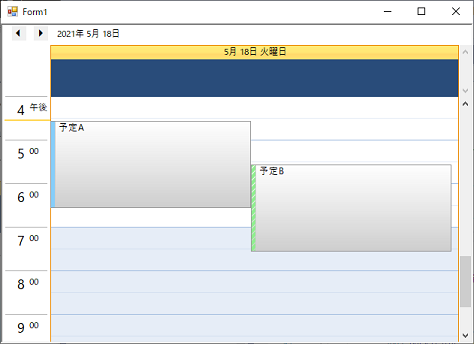
◎サンプルコード(VB)
Imports C1.Win.C1Schedule
Imports C1.C1Schedule

Public Class Form1
    Private Sub Form1_Load(sender As Object, e As EventArgs) Handles MyBase.Load
        ' ユーザーステータスの作成
        Dim item1 As New Status()
        item1.Text = "ステータス1"
        item1.Color = Color.LightSkyBlue  ' 方法①(色の指定)
        item1.Brush.Style = C1BrushStyleEnum.Solid  ' 方法①(パターン=単色を指定)
        C1Schedule1.DataStorage.StatusStorage.Statuses.Add(item1)
        Dim item2 As New Status()
        item2.Text = "ステータス2"
        item2.Color = Color.LightGreen ' 方法①(色の指定)
        item2.Brush.Style = C1BrushStyleEnum.BackwardDiagonal  ' 方法①(パターン=斜線を指定)
        C1Schedule1.DataStorage.StatusStorage.Statuses.Add(item2)

        ' 予定の作成
        Dim app As Appointment = C1Schedule1.DataStorage.AppointmentStorage.Appointments.Add()
        app.Start = DateTime.Now
        app.End = app.Start.AddHours(2)
        app.Subject = "予定A"
        app.BusyStatus = C1Schedule1.DataStorage.StatusStorage.Statuses(5)   ' ユーザーステータスを設定
        Dim app2 As Appointment = C1Schedule1.DataStorage.AppointmentStorage.Appointments.Add()
        app2.Start = DateTime.Now.AddHours(1)
        app2.End = app2.Start.AddHours(2)
        app2.Subject = "予定B"
        app2.BusyStatus = C1Schedule1.DataStorage.StatusStorage.Statuses(6)  ' ユーザーステータスを設定

        ' 最初に表示する時間帯の指定
        C1Schedule1.Settings.FirstVisibleTime = New TimeSpan(DateTime.Now.Hour, 0, 0)
        ' 再表示
        C1Schedule1.Refresh()
    End Sub
End Classusing C1.Win.C1Schedule;
using C1.C1Schedule;
namespace WindowsFormsApp1
{
public partial class Form1 : Form
{
public Form1()
{
InitializeComponent();
}
private void Form1_Load(object sender, EventArgs e)
{
// ユーザーステータスの作成
Status item1 = new Status();
item1.Text = "ステータス1";
item1.Color = Color.LightSkyBlue; // 方法①(色の指定)
item1.Brush.Style = C1BrushStyleEnum.Solid; // 方法①(パターン=単色を指定)
c1Schedule1.DataStorage.StatusStorage.Statuses.Add(item1);
Status item2 = new Status();
item2.Text = "ステータス2";
item2.Color = Color.LightGreen; // 方法①(色の指定)
item2.Brush.Style = C1BrushStyleEnum.BackwardDiagonal; // 方法①(パターン=斜線を指定)
c1Schedule1.DataStorage.StatusStorage.Statuses.Add(item2);
// 予定の作成
Appointment app = c1Schedule1.DataStorage.AppointmentStorage.Appointments.Add();
app.Start = DateTime.Now;
app.End = app.Start.AddHours(2);
app.Subject = "予定A";
app.BusyStatus = c1Schedule1.DataStorage.StatusStorage.Statuses[5]; // ユーザーステータスを設定
Appointment app2 = c1Schedule1.DataStorage.AppointmentStorage.Appointments.Add();
app2.Start = DateTime.Now.AddHours(1);
app2.End = app2.Start.AddHours(2);
app2.Subject = "予定B";
app2.BusyStatus = c1Schedule1.DataStorage.StatusStorage.Statuses[6]; // ユーザーステータスを設定
// 最初に表示する時間帯の指定
c1Schedule1.Settings.FirstVisibleTime = new TimeSpan(DateTime.Now.Hour, 0, 0);
// 再表示
c1Schedule1.Refresh();
}
}
}【方法②】
何らかの要件によって動的にステータスバーの色を変更する場合は、作成したユーザーステータスの色を設定せずにStatusStorageに追加して、各AppointmentオブジェクトのBusyStatusプロパティにこれらのユーザーステータスを設定します。次いで、BeforeAppointmentFormatイベントにて、要件に応じて e 引数のAppointment.BusyStatus.Colorを設定します。
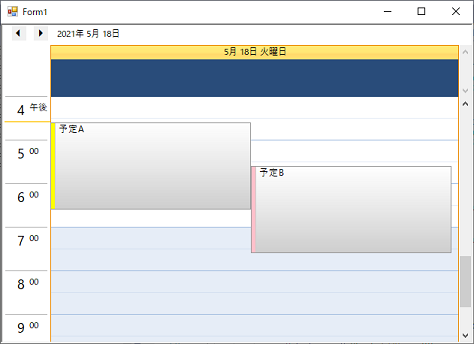
※この方法では、ステータスバーのパターンを設定することはできませんので、ご了承ください。
◎サンプルコード(VB)
Imports C1.Win.C1Schedule
Imports C1.C1Schedule

Public Class Form1
    Private Sub Form1_Load(sender As Object, e As EventArgs) Handles MyBase.Load
        ' ユーザーステータスの作成
        Dim item1 As New Status()
        item1.Text = "ステータス1"
        C1Schedule1.DataStorage.StatusStorage.Statuses.Add(item1)
        Dim item2 As New Status()
        item2.Text = "ステータス2"
        C1Schedule1.DataStorage.StatusStorage.Statuses.Add(item2)

        ' 予定の作成
         ' ・・・(以下「C1Schedule1.Refresh」まで方法①と同じ)・・・
    End Sub

    Private Sub C1Schedule1_BeforeAppointmentFormat(sender As Object, e As BeforeAppointmentFormatEventArgs) Handles C1Schedule1.BeforeAppointmentFormat
        If e.Text = "予定A" Then
            e.Appointment.BusyStatus.Color = Color.Yellow ' 方法②(色の指定)
        ElseIf e.Text = "予定B" Then
            e.Appointment.BusyStatus.Color = Color.Pink ' 方法②(色の指定)
        End If
    End Sub
End Class
using C1.Win.C1Schedule;
using C1.C1Schedule;

namespace WindowsFormsApp1
{
    public partial class Form1 : Form
    {
        public Form1()
        {
            InitializeComponent();
        }

        private void Form1_Load(object sender, EventArgs e)
        {
            // ユーザーステータスの作成
            Status item1 = new Status();
            item1.Text = "ステータス1";
            c1Schedule1.DataStorage.StatusStorage.Statuses.Add(item1);
            Status item2 = new Status();
            item2.Text = "ステータス2";
            c1Schedule1.DataStorage.StatusStorage.Statuses.Add(item2);

            //  予定の作成
            // ・・・(以下「c1Schedule1.Refresh」まで方法①と同じ)・・・
        }

        private void c1Schedule1_BeforeAppointmentFormat(object sender, C1.Win.C1Schedule.BeforeAppointmentFormatEventArgs e)
        {
            if ((e.Text == "予定A"))
            {
                e.Appointment.BusyStatus.Color = Color.Yellow; // 方法②(色の指定)
            }
            else if ((e.Text == "予定B"))
            {
                e.Appointment.BusyStatus.Color = Color.Pink; // 方法②(色の指定)
            }
        }
    }
}